Be prepared to show off your final independent project. Also have a data CD or DVD with all your work for this class burned on it. That would be:
Your 6-page Lulu spread
Your proposed Lulu book cover
Your illustrator shapes project
Your Jenna/Lane digital painting
Your composite photoshop drawing
Your Motion project
Your final project
Monday, May 3, 2010
Thursday, April 22, 2010
Lulu book, and final project
A reminder: come to Monday's class with the raw materials for your final project, so you can use a chunk of the class period to start work. We'll also catch up with a couple motion projects, and take a look at an artist who does work for projection on atypical projection surfaces.
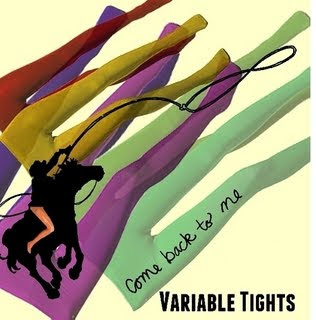
The Lulu book is finally ready for order and download. You can download digital copies immediately; I'd recommend holding off on ordering hard copies until we get a proof copy delivered (which I've just ordered -- it should arrive in about a week). The product page is here:
http://www.lulu.com/product/paperback/come-back-to-me-variable-tights/10645644
Tuesday, April 13, 2010
Wednesday morning
Hi all. I mentioned this last class, but as a reminder: I'll be about an hour late this Wednesday (4/13). Just jump into your Motion project, and I'll catch up with you when I arrive.
Also, don't forget to give some thought to what your final project, which should take up the last two weeks of class, will be. I'll want a formal plan of your intentions by Monday.
Also, don't forget to give some thought to what your final project, which should take up the last two weeks of class, will be. I'll want a formal plan of your intentions by Monday.
Monday, April 5, 2010
Due for Wed., April 7
At the beginning of class Wednesday, there are two things due:
1. Be prepared to show a few minutes of footage you've taken from the Prelinger archives, so we can all get a sense of what everyone has found. (MP4 is probably the best formay, if available)
2. If you haven't given your tutorial yet, be prepared to share your tutorial.
Also, give some thought to what your final, independent project will be.
Wednesday, March 31, 2010
Public Domain Video Source
We'll be using the Prelinger Archives as a source for raw material for our next "remix" project. Here are a couple links:
Prelinger Archives
Prelinger Archives Keyword Page
Prelinger Archives
Prelinger Archives Keyword Page
Wednesday, March 24, 2010
Split Screen Project (& odds & ends)
So -- on Monday's class, we'll catch up with the outstanding tutorials and the composite photoshop drawings. We really need to clear these assignments out.
And, as a start to the coursework looking at digital media for projection (as opposed to print), you have a Split Screen assignment, also due on Monday. You should use the youtube doubler to make a mash-up of two videos currently hosted on youtube. Remember that juxtaposition is key to this sort of approach -- how do the two videos relate to each other, when they're presented simultaneously, side-by-side. Connections can be on a formal level (shape, color, rhythm) or a content level (having one video "commenting" on the video beside it).
Please paste the URL of your doubled video in the comments section of this blog post; if you can't post comments, then email me the URL at my school address.
Here's the doubler:
http://youtubedoubler.com/
Here are links to some of the split screen examples I showed in class:
Sisters:
http://www.splitscreen.us/2007/02/sisters.html
Rules of Attraction:
http://www.youtube.com/watch?v=Dzv_B-f0t9o
500 Days of Summer:
http://www.slashfilm.com/2009/06/10/a-must-watch-video-clip-from-500-days-of-summer-expectation-vs-reality/
Chelsea Girls:
http://www.youtube.com/watch?v=R6yBhWLnvR0
Monday, March 15, 2010
Over Break: drawing composite and tutorial
Just a reminder that your finished "drawing composite" piece is due at the beginning of class when we get back from break. Also on Mon you should be prepared to lead the class in a photoshop tutorial. Remember to try it out before you present it. Email me (at clanier [at] sierranevada.edu) your tutorial choice by the end of day monday (3/15). I want to make sure people aren't choosing the same tutorial.
Have a great break!
Have a great break!
Monday, March 8, 2010
Due Wednesday - Jenna/Lane project, and start for new drawing composite
Your Jenna/Lane portrait is due at the beginning of next class. Have a flattened tiff file on a drive or ready to be put on a drive.
Continuing with the usage of brushes in Photoshop, the next project will also be a tracing/drawing project, in which you'll composite two photos, and then use the composite as a basis to trace out an illustration. You won't have to composite the two photos perfectly -- since you're ultimately making a drawing, you can correct discrepancies of lighting at the drawing stage, and a lot of the tell-tale details that you need to painstakingly correct when making two photos seem like one realistic photo can just be omitted at the drawing stage.
The theme for the drawing will be to take some figure or object and put it somewhere it doesn't belong. It could be a godzilla-size dog stomping through a skyline, a bird perched in an aquarium, someone practicing yoga at the top of a flagpole. The more impossible the better. The final drawing should be 8 inches by 10 inches, 600dpi -- it doesn't matter if it's in portrait or landscape format. Please come prepared with your photographic images at the beginning of next class -- if you want to shoot your own photos for this project, feel free.
Thursday, March 4, 2010
Photos for the Photoshop brushes/wacom project
Here's a direct link to the photo set, from which you can get to individual photos and download larger sizes:
http://www.flickr.com/photos/sncfa/sets/72157623429719209
These pictures will be first-come, first-serve. Each person will have to pick a different photo. If you want to "claim" a photo before class, call it out in the "comments" section of this blog post, identifying the photo by name (they all have names like IMG_0792)
Wednesday, March 3, 2010
Photoshop brushes assignment
Here are the steps for the current assignment -- using photoshop brushes to make tracings from photos, and to provide textures and patterns.
1. The dimensions for this assignment are 3 in wide by 4.5 in tall, 600 dpi.
2. Bring your reference photo into a layer, and crop it to whatever size you wish.
3. Create a new, empty layer above the photo layer, and use this layer to create black outlines with the Wacom tablet. Choose a relatively thick brush size, say 40 pixels. Once you have your major lines, create a layer mask for your outline layer, make your brush half the size (about 20 pixels), and start chipping away at the edges of your brush strokes, for a sort of "scratchboard" style.
4. Once you're done with the outlines, create a new empty layer under the outline layer, and dial down the opacity of your brushes to create a color layer.
5. For the background, download some photoshop art brushes, and create an abstract texture.
I've posted a link to "Brush King" in the sidebar -- links down free downloadable Photoshop brushes. And here as some links for further reference below.
Overview of the brushes panel:
http://www.communitymx.com/content/article.cfm?page=1&cid=B0100
Two digital painting tutorials:
http://www.cgarena.com/freestuff/tutorials/photoshop/blackbashi/index.html
http://www.eyesontutorials.com/articles/5298/1/Environment/Page1.html
Wednesday, February 17, 2010
Next class: sketch for cover
A reminder: for Monday's class, come in with a sketch for your cover idea for the book:
"Come Back To Me Variable Tights"
And bring whatever materials you need to work on your version of the cover. We'll have one in-class period to work on it.
"Come Back To Me Variable Tights"
And bring whatever materials you need to work on your version of the cover. We'll have one in-class period to work on it.
Wednesday, January 27, 2010
For Monday's class
Be prepared on Monday's class to dive into your 6-page project. By the end of Monday's class, you need to have all your fonts chosen and your text laid out in InDesign -- as well as having a couple of your images inserted into the layout.
To the right, I've posted links to free fonts download sites and a source for free stock images.
To the right, I've posted links to free fonts download sites and a source for free stock images.
Wednesday, January 20, 2010
Welcome, and first assignment
Hi there -- here's the blog for the Advanced/Intermediate Digital Darkroom class.
Your first project will be to work on layout for a illustrated story for a publish-on-demand book we'll be producing. You are responsible for six pages in the book, and there should be a fairly even balance between text and image. You can illustrate the story either through drawings, collage, or photography -- all of the visual images must be your own (that is, you can't just google somebody else's images and stick them in there).
The story you want to illustrate is of your own choosing. It can be a story of your own, or a story of someone else's -- obviously, the story should be quite short. It could also be a collection of poems.
If you're totally stumped for a story, pick one from this series of strange little stories by Daniil Kharms.
Be adventurous in your layout choices (keep in mind the examples shown in class today). Try to have layout and font choice reflect qualities of the story itself. By next class (Monday), you need to have your story selected, and you also need to have a rough sketch of your 6 pages. Have at least the raw materials for your illustrations, so you can begin the layout and production of your illustrated story.
The dimensions of the book are going to be 8.5" x 8.5"
Subscribe to:
Posts (Atom)